



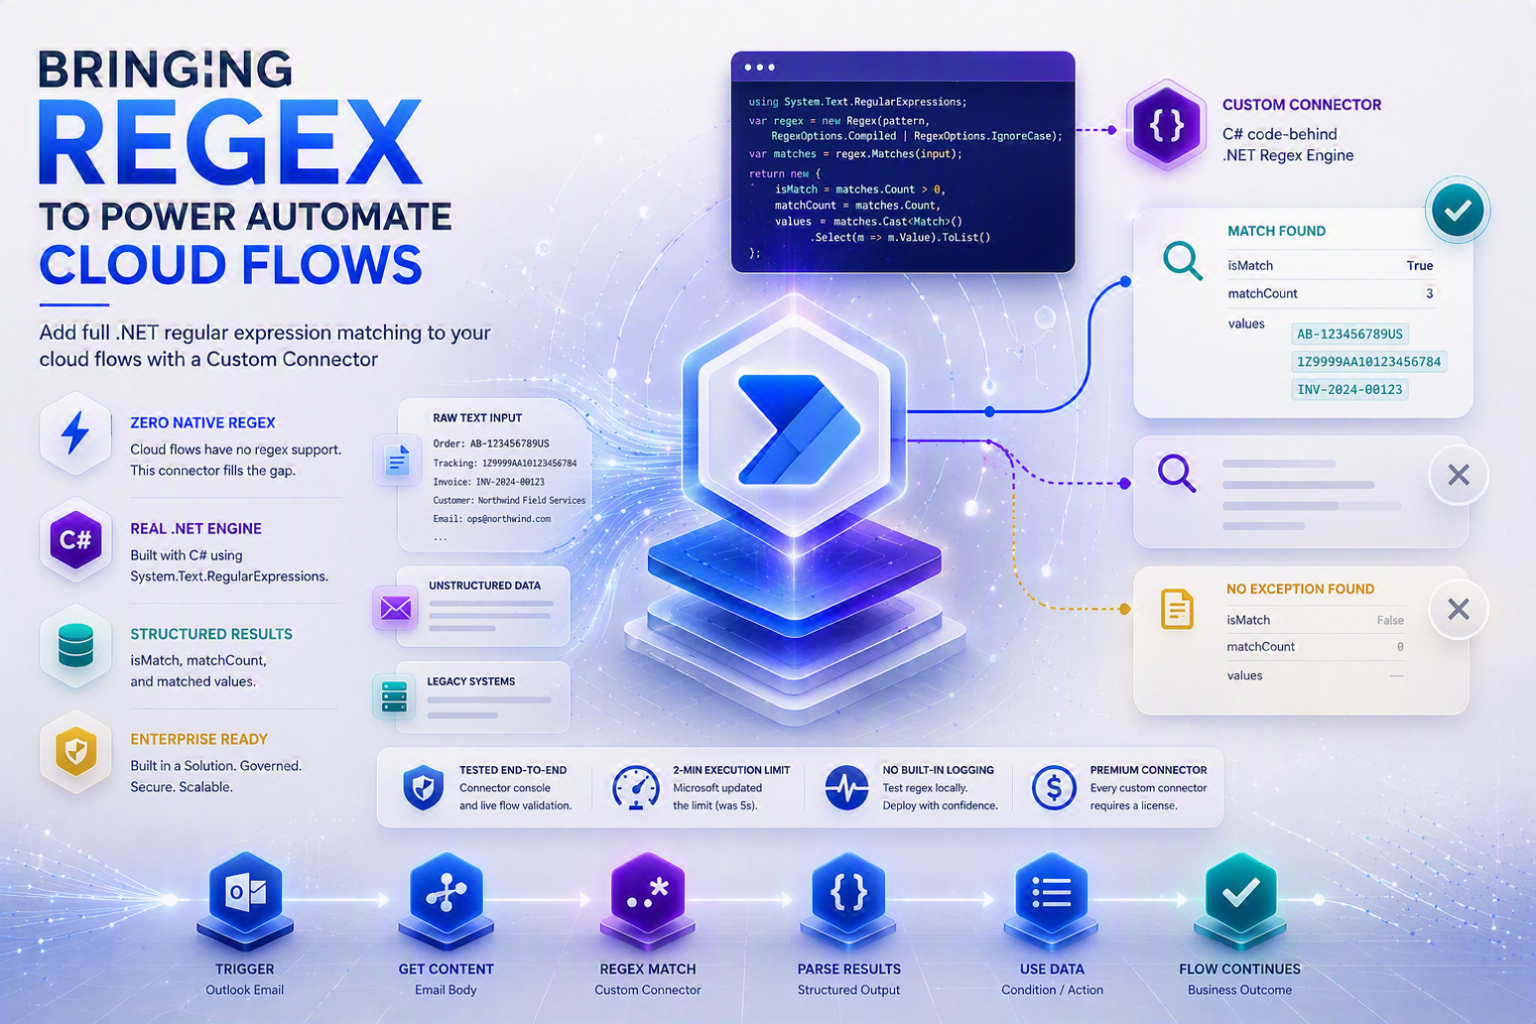
📌 Interface screenshots in this guide are illustrative. Microsoft updates its UI regularly — the actual screens may look slightly different depending on your version or environment. The workflow and steps described here remain accurate regardless of visual changes.
Power Automate Cloud flows ship with a lot of built-in actions. Regex isn’t one of them. Not even a limited version — there’s no regex() function, no match() expression, nothing in the standard expression language that lets you describe and search for a text pattern. Power Automate Desktop has it. Power Apps canvas apps have it through Power Fx. Cloud flows don’t.
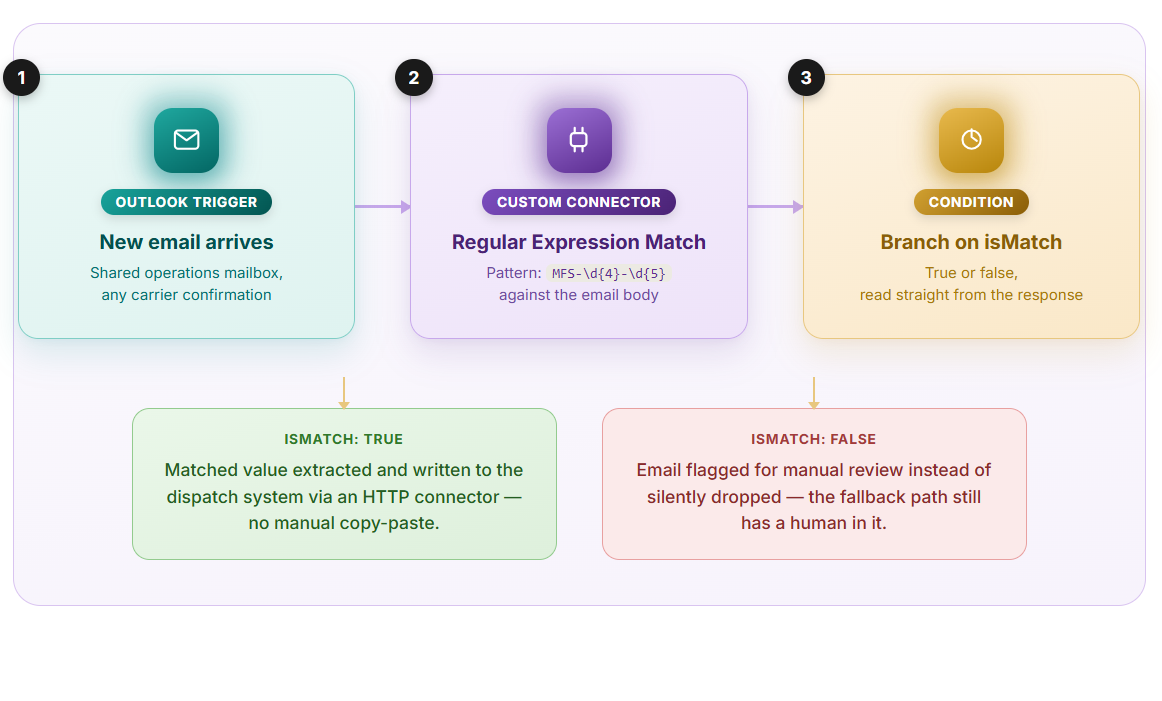
That gap creates friction in a surprising number of real scenarios. Extracting a tracking number from a forwarded email. Validating an invoice number format before writing it to a system of record. Pulling a URL out of unstructured text. Without regex, you stack Compose actions, nested Condition blocks, and string functions until the flow becomes something only its creator can read.
This guide shows how to close that gap using a Custom Connector — a way to add a brand-new action to Power Automate that doesn’t exist out of the box. Normally a custom connector wraps an external API. Here we use the same mechanism for a different purpose: attaching a small piece of C# that runs server-side and exposes .NET’s full System.Text.RegularExpressions namespace as a first-class flow action.
💡 Who this is for
If you already know what a Custom Connector is and want to get straight to the build, jump to Section 3. Section 2 covers the code-behind pipeline and platform constraints — worth reading even if you skip it now, because the limits here are real and they matter at rollout time.
1. Cloud Flows and the Regex Gap
A quick definition before anything else: a Custom Connector is a wrapper you build that makes an action available inside Power Automate exactly like a built-in action. You define what it accepts, what it returns, and Power Automate surfaces it in the flow designer’s action picker. Normally this wraps an external REST API. This guide uses that mechanism for something with no API behind it at all — just code that runs locally inside the connector’s own pipeline.
Regular expression (regex — a way of describing a text pattern so code can search for it, validate it, or extract pieces of it; for example, the pattern for “an email address” or “a date in YYYY-MM-DD format”) support in Power Automate breaks down like this:
✅ Has regex
- Power Automate Desktop flows — native actions
- Power Apps Canvas Apps — IsMatch, Match, MatchAll via Power Fx
❌ No native regex
- Power Automate Cloud flows — no regex() function, no match() expression, nothing
The practical scenarios where this bites you include extracting tracking numbers from forwarded shipping emails, validating purchase order formats before writing to a system of record, pulling URLs from unstructured text blobs, and cleaning data fields arriving from legacy systems. Without regex, these get solved with chains of indexOf, substring, and replace calls nested inside Condition blocks — flows that work, but grow fast and break silently on edge cases.
2. The Workaround: Code-Enabled Custom Connectors
Power Automate (and Power Apps, and Copilot Studio, and Azure Logic Apps) custom connectors support an optional feature called code-behind — sometimes labeled “Code Editor” or “Code (Preview)” depending on which version of the portal you’re looking at. This feature lets you attach a small piece of C# to one or more operations defined in the connector’s OpenAPI/Swagger definition (OpenAPI — a standard format for describing the structure of an API: what endpoints it has, what parameters they accept, and what they return; Swagger is the older name for the same specification).
The C# code runs server-side, inside the connector’s request/response pipeline. It receives the incoming request, can transform it however it needs to, and returns an HttpResponseMessage. And critically — it has access to the full System.Text.RegularExpressions namespace from .NET. Real regex. The same dialect used across most .NET applications.
How the code-behind pipeline works
Every code-enabled custom connector operation is backed by a class that inherits from ScriptBase — a base class Microsoft provides specifically for this feature. Your class overrides ExecuteAsync(), the method that runs on every call. Inside that method, the pattern is straightforward:
- Read
this.Context.OperationIdto figure out which operation was called. The operation ID is the unique name given to an action in the connector’s Swagger definition — a single connector can expose multiple operations, each with its own logic, and this ID is how the code tells them apart. - Parse the incoming request body
- Run your logic — in this case, a regex match
- Build a JSON response and return it
⚠️ Watch out: base64-encoded operation IDs
Microsoft’s own documentation flags a known issue: in certain regions, the operation ID comes back base64-encoded instead of plain text. If your if check never matches and you’re getting “Unknown operation ID” errors despite the name looking correct — that’s why. The safe approach is decoding the value first and falling back to the plain string if decoding fails.
Hard platform constraints
Two limits apply to every code-enabled operation and are not configurable:
| Constraint | Limit |
|---|---|
| Maximum execution time | 5 seconds (see note below) |
| Maximum code file size | 1 MB |
📌 Contradicted in Microsoft’s own docs
The Code tab UI, the “Create from blank” tutorial on Microsoft Learn, and several community posts all say 5 seconds. A separate Microsoft Learn page (“Write code in a custom connector”) says the limit was raised to 2 minutes for newly created connectors. Until Microsoft reconciles this, design for 5 seconds. For regex matching against typical text payloads, neither limit matters — the operation completes in milliseconds.
Other limitations confirmed by Microsoft
Beyond the two headline limits, Microsoft’s documentation lists several additional restrictions that don’t usually appear in tutorials but matter for enterprise rollouts:
- Single script file per connector. All logic lives in one
Scriptclass — you can’t split it across multiple files. - No built-in logging or tracing. There’s no supported way to get a debug trace of what the code-behind did during a specific run. The practical workaround is testing locally first, keeping the logic as simple as possible.
- Fixed, limited set of .NET namespaces. Code-behind runs on .NET Standard 2.0 with only a specific list of namespaces available. The regex namespace used in this guide (
System.Text.RegularExpressions) is included — but many other common .NET libraries are not. No external libraries can be added. - No on-premises data gateway support. If part of your scenario requires reaching a system through the on-premises data gateway, this approach is a dead end for that portion.
- Limited reach inside a Virtual Network. In a Power Platform environment connected to a Virtual Network for network isolation, the code-behind can only reach public endpoints — not anything exposed only on private endpoints inside that network.
💡 None of these block the regex use case
A self-contained regex match doesn’t need external libraries, doesn’t touch the on-premises gateway, and doesn’t reach private endpoints. These limitations matter if you’re ever tempted to extend the same code-behind to do more things later.
3. Building the Regex Custom Connector — Step by Step
🧩 Why build this inside a Solution?
Power Platform has two ways to create a Custom Connector: directly from Data → Custom Connectors, or from inside a Solution.
A Solution is the unit of transport in Power Platform ALM (Application Lifecycle Management — the practice of moving components between environments in a controlled, repeatable way: Dev → UAT → Production). Any component built inside a Solution can be exported as a package and imported into another environment cleanly. A connector built outside a Solution is locked to the environment where it was created — you can’t promote it through a pipeline, you can’t version it, and moving it later means rebuilding it from scratch.
For anything beyond a one-off proof of concept, Solutions are the only approach that doesn’t create ALM debt the moment you want to go to production. This guide uses the Solution approach throughout.
If you’re only testing locally and don’t need to promote this anywhere, the connector wizard steps are identical — just start from Data → Custom Connectors → New custom connector → Create from blank instead of Step 0 below.
Step 0 — Create a new Solution
Navigate to Solutions in the Power Apps or Power Automate maker portal (left sidebar), then click New solution. Fill in the fields as follows:
| Field | Value |
|---|---|
| Display name | Text Pattern Tools |
| Name | Auto-populated from display name — leave as is |
| Publisher | Your existing publisher if you have one. If not, click + New publisher, choose a short prefix (e.g. vsg, fab) — this prefix is prepended to every component in this solution. Avoid the default Common Data Services publisher in any environment beyond personal dev. |
| Version | 1.0.0.0 |
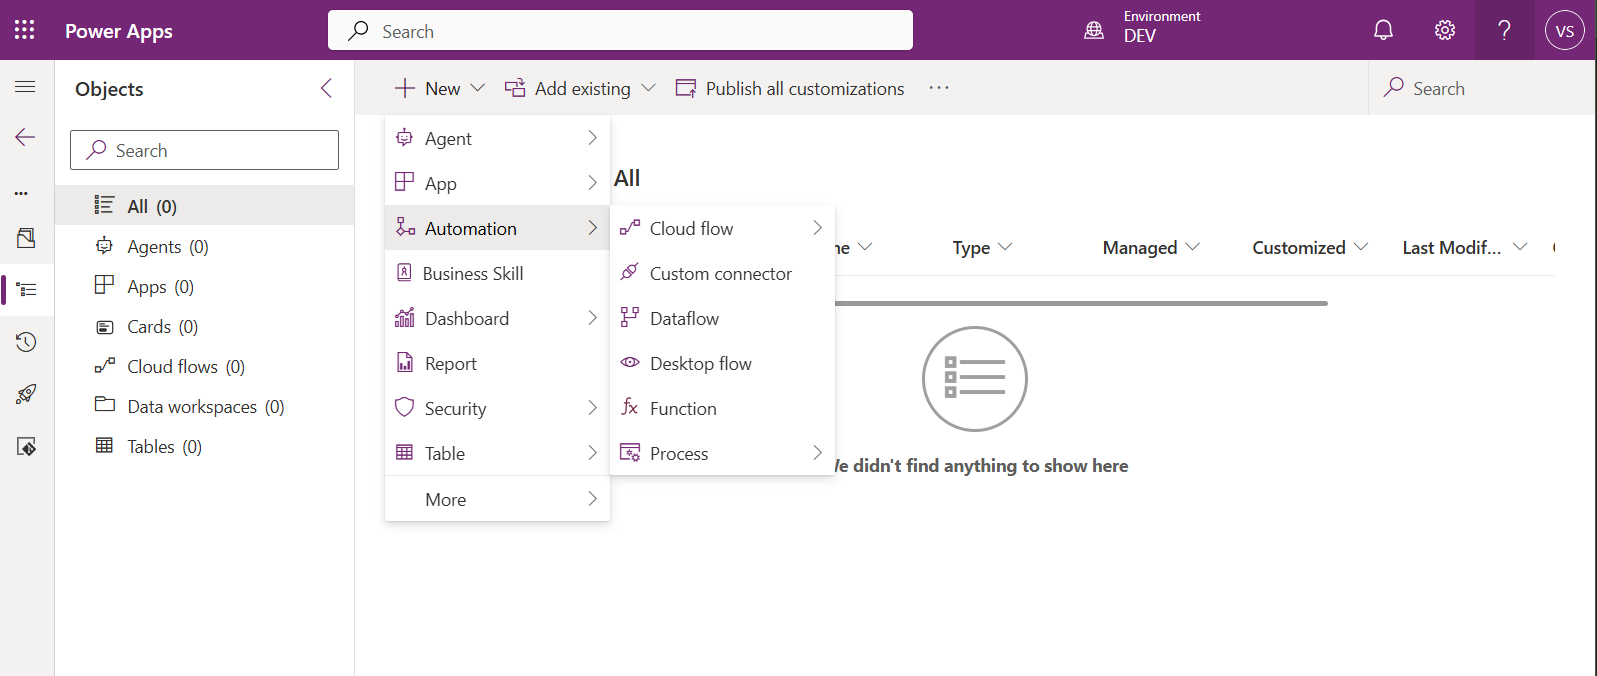
Click Create. The solution opens and is empty. Now click New → Automation → Custom connector.
Step 1 — Tab 1: General
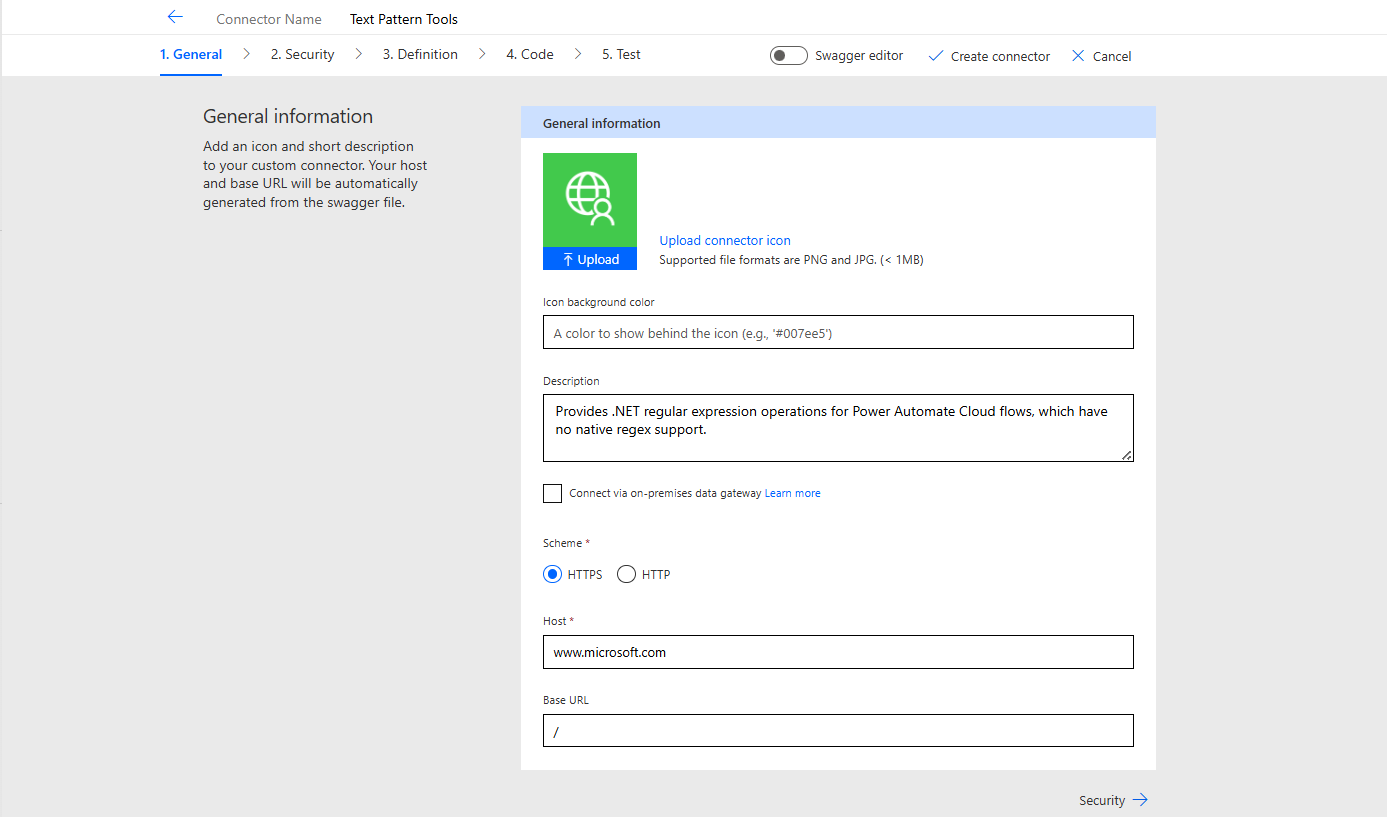
The connector wizard opens directly on the General tab. Work through the fields top to bottom.
Connector Name — enter Text Pattern Tools. The publisher prefix from your solution will be applied automatically to the internal name.
Icon background color — enter #0066FF (Power Automate blue). Leave the icon image blank — the background color alone is enough for the action picker.
Description — enter: Provides .NET regular expression operations for Power Automate Cloud flows, which have no native regex support.
Scheme — leave HTTPS selected (default). Host — enter www.microsoft.com. This field is required by the connector framework even though no external call is ever made — the platform needs a host to validate before your code-behind executes. Base URL — enter /.
Click Security → to continue.
Step 2 — Tab 2: Security
Authentication type — select No authentication. This connector runs local C# logic only — no external service involved, no credentials needed.
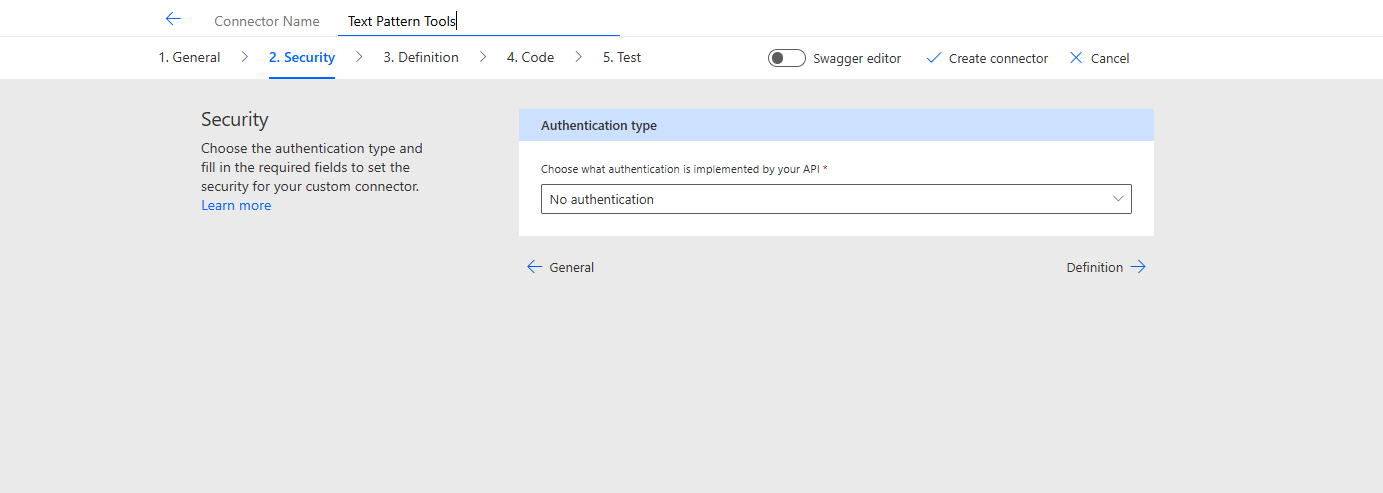
Click Definition → to continue.
Step 3 — Tab 3: Definition
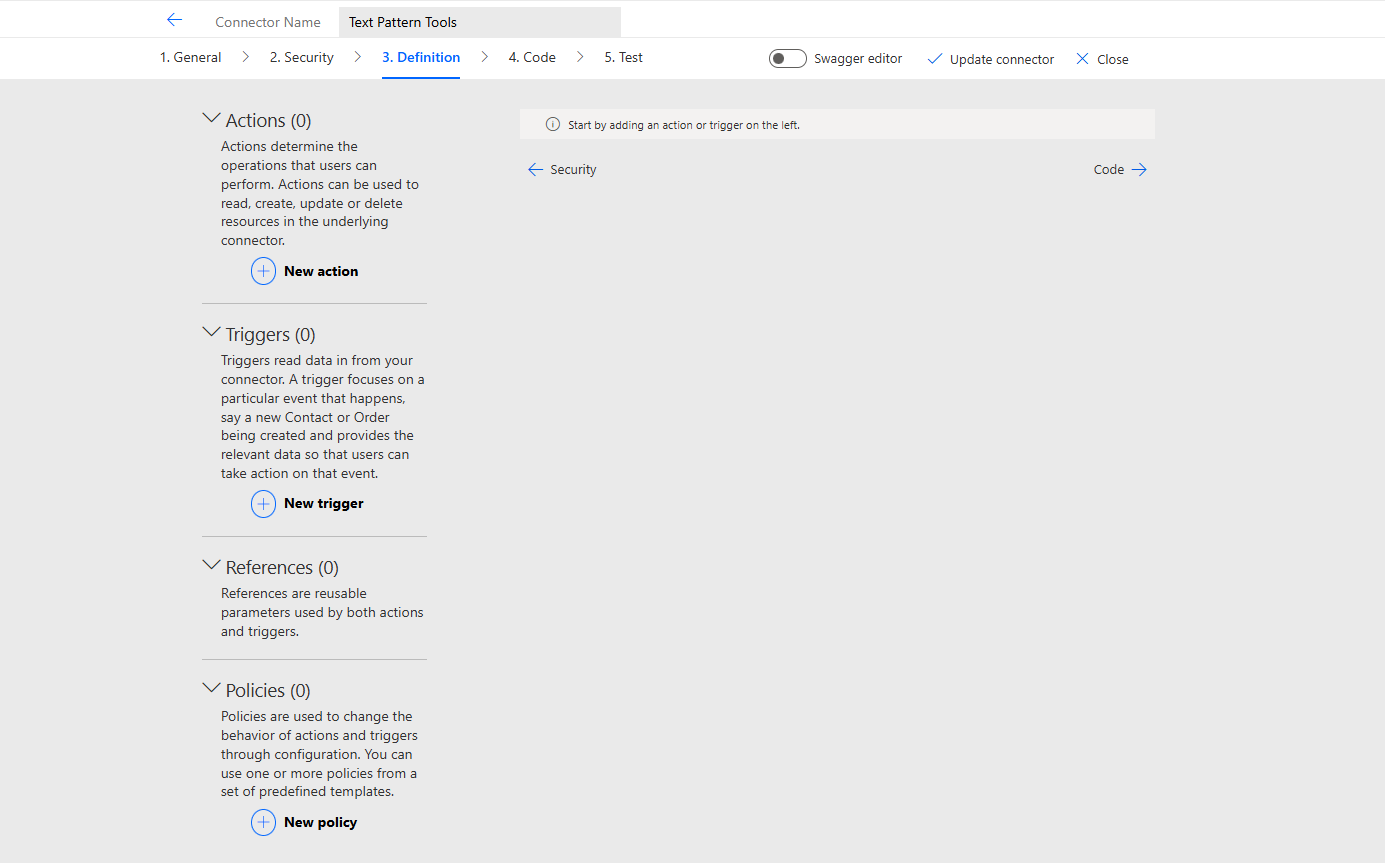
The Definition tab shows four sections. For this connector you only need Actions:
- Actions — the operations a flow can call on this connector. This is what you’re building: a “Regular Expression Match” action that a maker drops into a flow like any other step.
- Triggers — events the connector can listen to and use to start a flow. Not needed here.
- References — reusable parameter definitions shared across actions or triggers. Not needed here.
- Policies — runtime transformations applied to requests or responses. Not needed here.
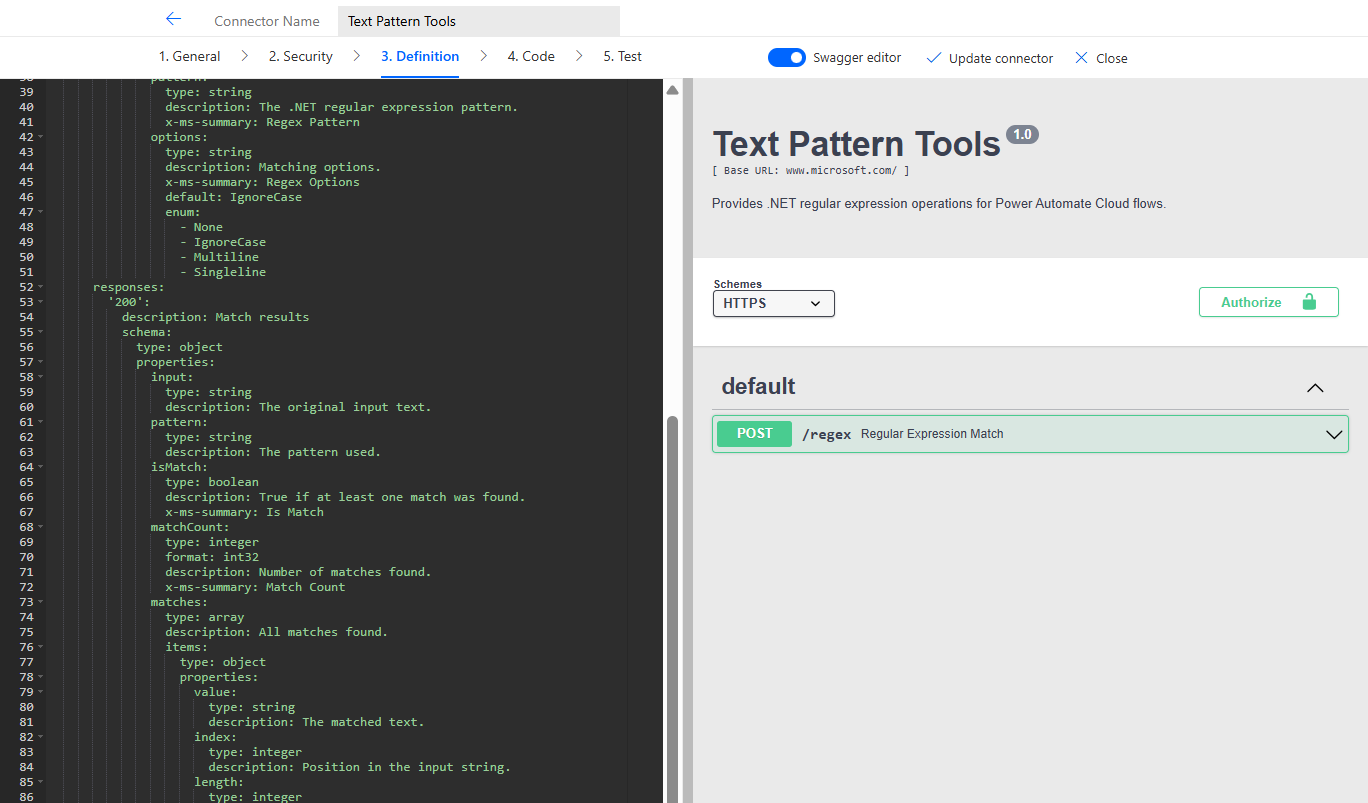
This article is about bringing regex into Power Automate — not a full Custom Connector tutorial. Rather than clicking through every field in the GUI, the fastest and most precise way to define the action is through the Swagger editor: a single YAML block that sets the action name, operation ID, all input parameters, their types, and the full response schema in one shot.
Toggle the Swagger editor switch in the top right of the wizard. Replace the entire content with this YAML:
swagger: "2.0"
info:
  title: Text Pattern Tools
  description: Provides .NET regular expression operations for Power Automate Cloud flows.
  version: "1.0"
host: www.microsoft.com
basePath: /
schemes:
  - https
paths:
  /regex:
    post:
      summary: Regular Expression Match
      description: Searches the input text for all occurrences of a .NET regular expression pattern and returns all matches.
      operationId: RegexFindMatches
      x-ms-visibility: important
      consumes:
        - application/json
      produces:
        - application/json
      parameters:
        - in: body
          name: body
          required: true
          schema:
            type: object
            required:
              - input
              - pattern
              - options
            properties:
              input:
                type: string
                description: The text to search against the pattern.
                x-ms-summary: Text to Search
              pattern:
                type: string
                description: The .NET regular expression pattern.
                x-ms-summary: Regex Pattern
              options:
                type: string
                description: Matching options.
                x-ms-summary: Regex Options
                default: IgnoreCase
                enum:
                  - None
                  - IgnoreCase
                  - Multiline
                  - Singleline
responses:
"200":
description: Match results
schema:
type: object
properties:
input:
type: string
description: The original input text.
pattern:
type: string
description: The pattern used.
isMatch:
type: boolean
description: True if at least one match was found.
x-ms-summary: Is Match
matchCount:
type: integer
format: int32
description: Number of matches found.
x-ms-summary: Match Count
matches:
type: array
description: All matches found.
items:
type: object
properties:
value:
type: string
description: The matched text.
index:
type: integer
description: Position in the input string.
length:
type: integer
description: Length of the match.A few things in this YAML worth understanding before you move on:
operationId: RegexFindMatches— the string the C# code-behind reads to decide which method to call. It must match exactly — including case — what you write in theifcheck in the code. If they don’t match, every call returns a400 BadRequestwith “Unknown operation ID.”x-ms-visibility: important— a Power Platform extension that surfaces this action prominently in the flow designer’s action picker, instead of burying it under “Show more.”x-ms-summary— sets the friendly label shown to makers in the flow designer for each parameter. Without it, the designer shows the raw field name (input,pattern,options).enumonoptions— defines the dropdown values a maker sees when filling in this parameter. Without this,optionsis a free-text field — a maker could type anything, including values the C# switch doesn’t handle.- The response schema — this is what makes
isMatch,matchCount, andmatchesavailable as dynamic content tokens in the flow designer. Without it, the action returns a raw JSON blob that every flow using this connector would need to parse manually withjson()expressions.
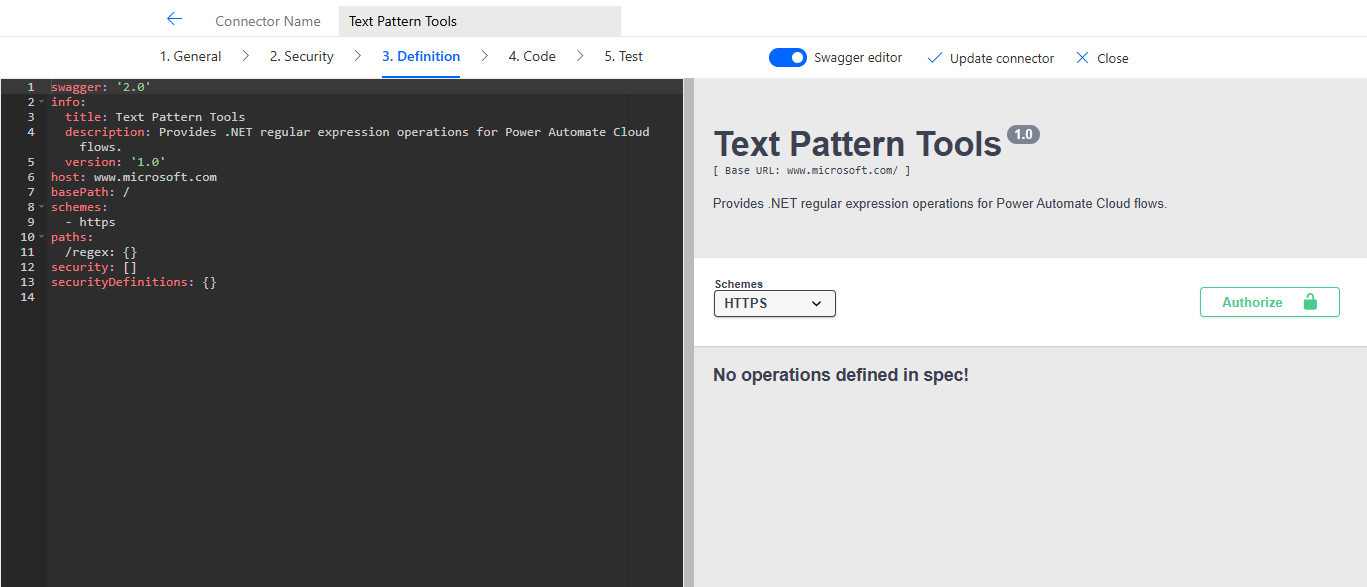
The preview panel on the right updates in real time as you edit. Expand the POST /regex row to confirm the three parameters are listed and that options shows IgnoreCase as the default — that tells you the enum and default are being read correctly before you even save.
Toggle Swagger editor off. The action Regular Expression Match now appears under Actions.
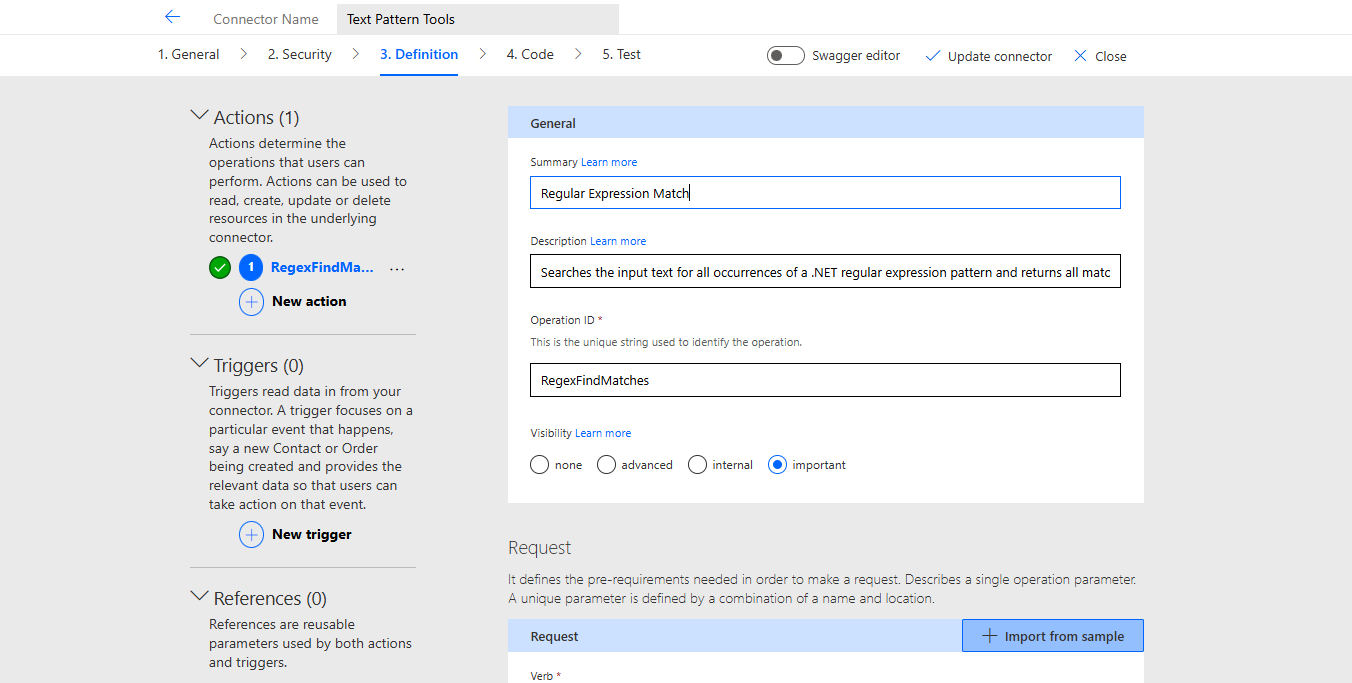
Click Update connector to save before moving to the Code tab.
⚠️ Validation warning: “Path not defined”
You’ll see a red error in the Validation section at the bottom. This is expected and harmless — the /regex path in the YAML isn’t a real external endpoint. The code-behind intercepts all requests before they ever reach it. Ignore this warning.
Step 4 — Tab 4: Code
Click 4. Code in the tab bar at the top. Switch the toggle from Code Disabled to Code Enabled.
Below the toggle appears an Operations dropdown — click it and select RegexFindMatches. If you leave it empty, the code applies to all operations in the connector. That works for now, but it’s a problem if you ever add more operations later.
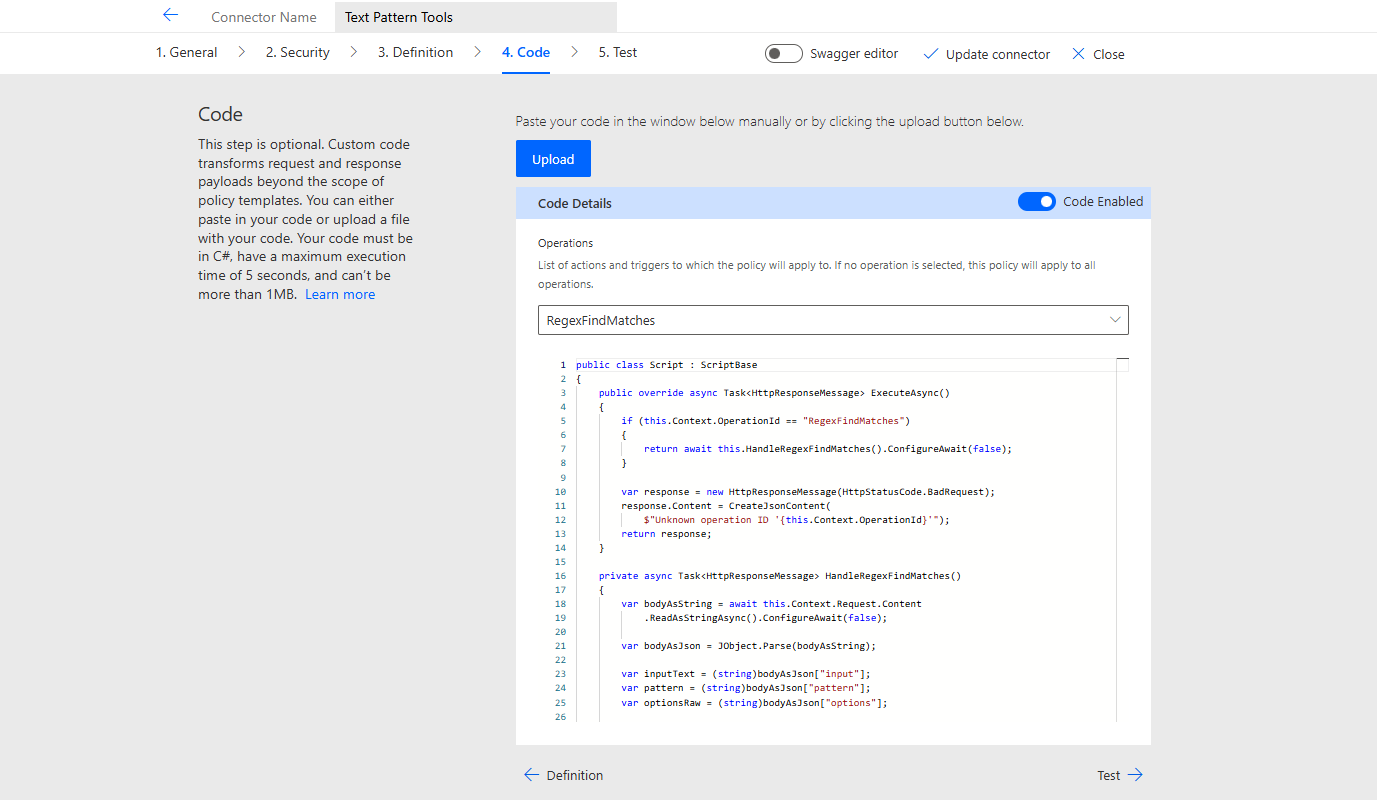
The editor shows a default “Hello World” implementation. Replace the entire content with this complete script — copy it as a single block:
public class Script : ScriptBase
{
    public override async Task ExecuteAsync()
    {
        if (this.Context.OperationId == "RegexFindMatches")
        {
            return await this.HandleRegexFindMatches().ConfigureAwait(false);
        }

        var response = new HttpResponseMessage(HttpStatusCode.BadRequest);
        response.Content = CreateJsonContent(
            $"Unknown operation ID '{this.Context.OperationId}'");
        return response;
    }

    private async Task HandleRegexFindMatches()
    {
        var bodyAsString = await this.Context.Request.Content
            .ReadAsStringAsync().ConfigureAwait(false);

        var bodyAsJson = JObject.Parse(bodyAsString);

        var inputText = (string)bodyAsJson["input"];
        var pattern = (string)bodyAsJson["pattern"];
        var optionsRaw = (string)bodyAsJson["options"];

        var regexOptions = optionsRaw switch
        {
            "None" => RegexOptions.Compiled,
            "IgnoreCase" => RegexOptions.IgnoreCase | RegexOptions.Compiled,
            "Multiline" => RegexOptions.Multiline | RegexOptions.Compiled,
            "Singleline" => RegexOptions.Singleline | RegexOptions.Compiled,
            _ => RegexOptions.Compiled
        };

        var regex = new Regex(pattern, regexOptions, TimeSpan.FromSeconds(1));
        var matches = regex.Matches(inputText);

        var serializer = JsonSerializer.Create(new JsonSerializerSettings
        {
            ReferenceLoopHandling = ReferenceLoopHandling.Ignore
        });

        var result = new JObject
        {
            ["input"] = inputText,
            ["pattern"] = regex.ToString(),
            ["isMatch"] = regex.IsMatch(inputText),
            ["matchCount"] = matches.Count,
            ["matches"] = JArray.FromObject(matches, serializer)
        };

        var response = new HttpResponseMessage(HttpStatusCode.OK);
        response.Content = CreateJsonContent(result.ToString());
        return response;
    }
}
Breaking it down — read this after pasting, not before:
ExecuteAsyncis the entry point for every call. It readsthis.Context.OperationIdand routes to the right handler. If the ID doesn’t match anything known, it returns a clean400instead of crashing silently — useful if you add more operations to this connector later.HandleRegexFindMatchesreads the raw request body as a string, parses it as JSON, and pulls out the three input fields. The field names ("input","pattern","options") must match the property names in the Swagger YAML exactly.- The switch on
optionsRawmaps the string value to the corresponding .NETRegexOptionsflags.RegexOptions.Compiledis included in every branch — it compiles the pattern to IL at construction time, improving performance on repeated matching.TimeSpan.FromSeconds(1)sets an explicit matching timeout: a poorly written pattern with nested quantifiers can cause catastrophic backtracking (the regex engine trying an exponential number of combinations and hanging). One second fails fast without consuming the connector’s execution ceiling. - The final block runs the regex, builds a JSON result object with all the fields defined in the Swagger response schema, and returns it as
200 OK.ReferenceLoopHandling.Ignoreprevents the serializer from throwing on circular references in theMatchCollectionobject.
⚠️ Execution time limit — still contradicted in the docs
The Code tab UI shows “maximum execution time of 5 seconds.” A separate Microsoft Learn page states the limit was raised to 2 minutes for newly created connectors. Until Microsoft reconciles this, design for 5 seconds. For regex matching against typical text payloads, neither limit is relevant — the operation completes in milliseconds.
Click Create connector in the top right of the wizard to save and publish the connector.
💡 The save can take 20–30 seconds
Don’t click again if nothing happens immediately. Wait for the confirmation before moving on.
Step 5 — Tab 5: Test
Once the connector is saved, click 5. Test in the tab bar. The Test tab shows two sections: Connections at the top and Operations (1) below.
In the Connections section, the Selected connection dropdown shows “None.” Click + New connection — since authentication is set to none, this creates the connection immediately with one click.
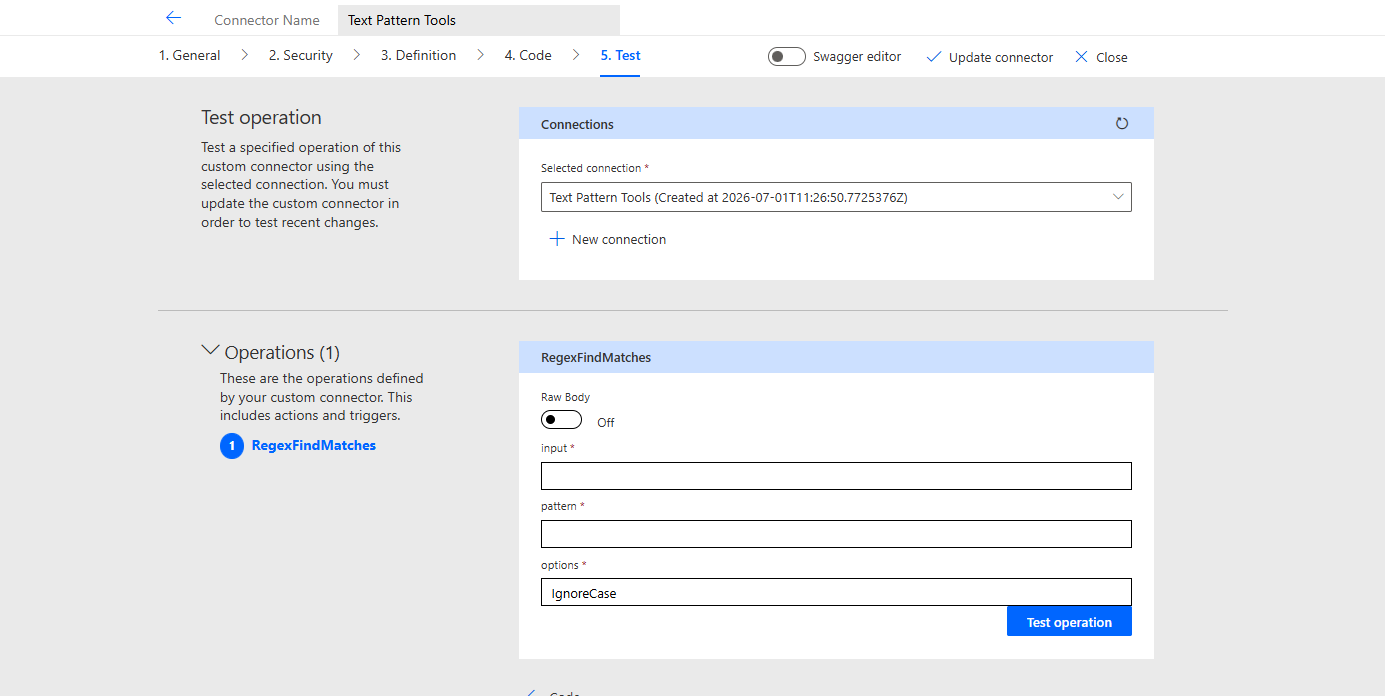
Once the connection is created, fill in the RegexFindMatches section. In a real flow, input will be dynamic content — body of an email, a field from a form, output from a previous action. Here we pass a static string to verify the connector works end to end.
- input:
Order ref ORD-2026-00042 confirmed. Tracking number MFS-2026-04417 assigned. - pattern:
MFS-\d{4}-\d{5} - options:
IgnoreCase(already pre-filled)
💡 Raw Body toggle
If you switch Raw Body to On, the three separate fields collapse into a single JSON editor — useful if you want to paste the full request body at once instead of filling fields one by one.
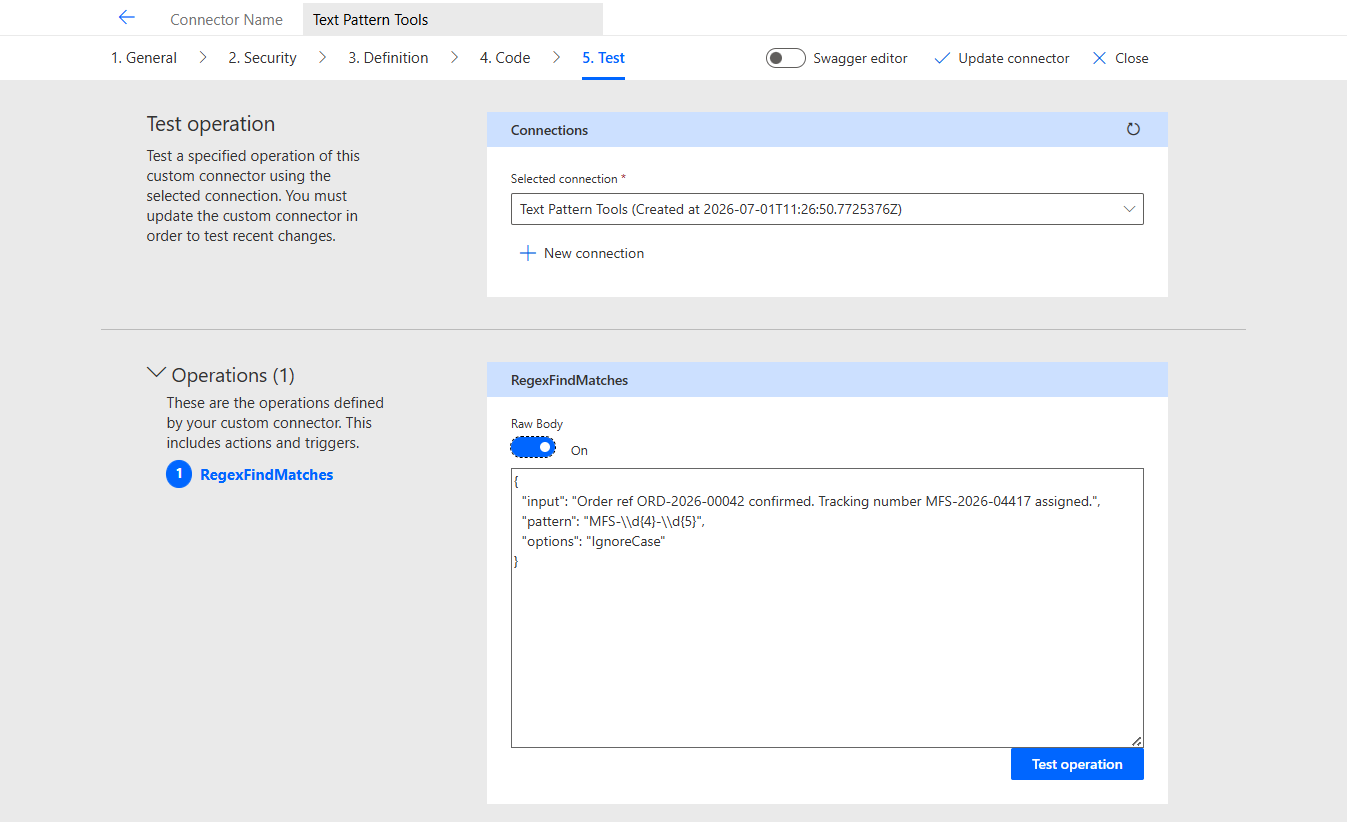
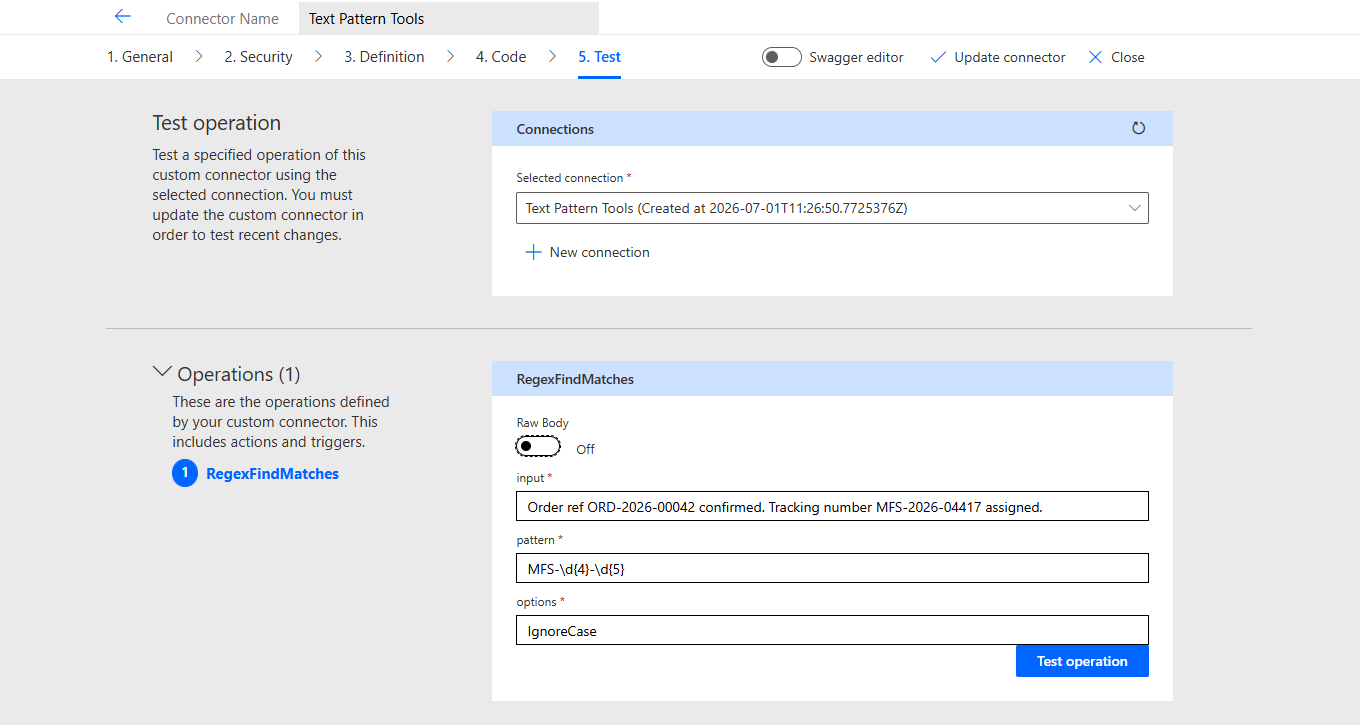
Click Test operation. The result appears in three tabs below:
- Request — the actual HTTP call sent to the connector. Useful for debugging.
- Response — Status, Headers, and Body. This is what you want to check.
- Code Logs — shows portal HTML, not useful for debugging the connector code itself.
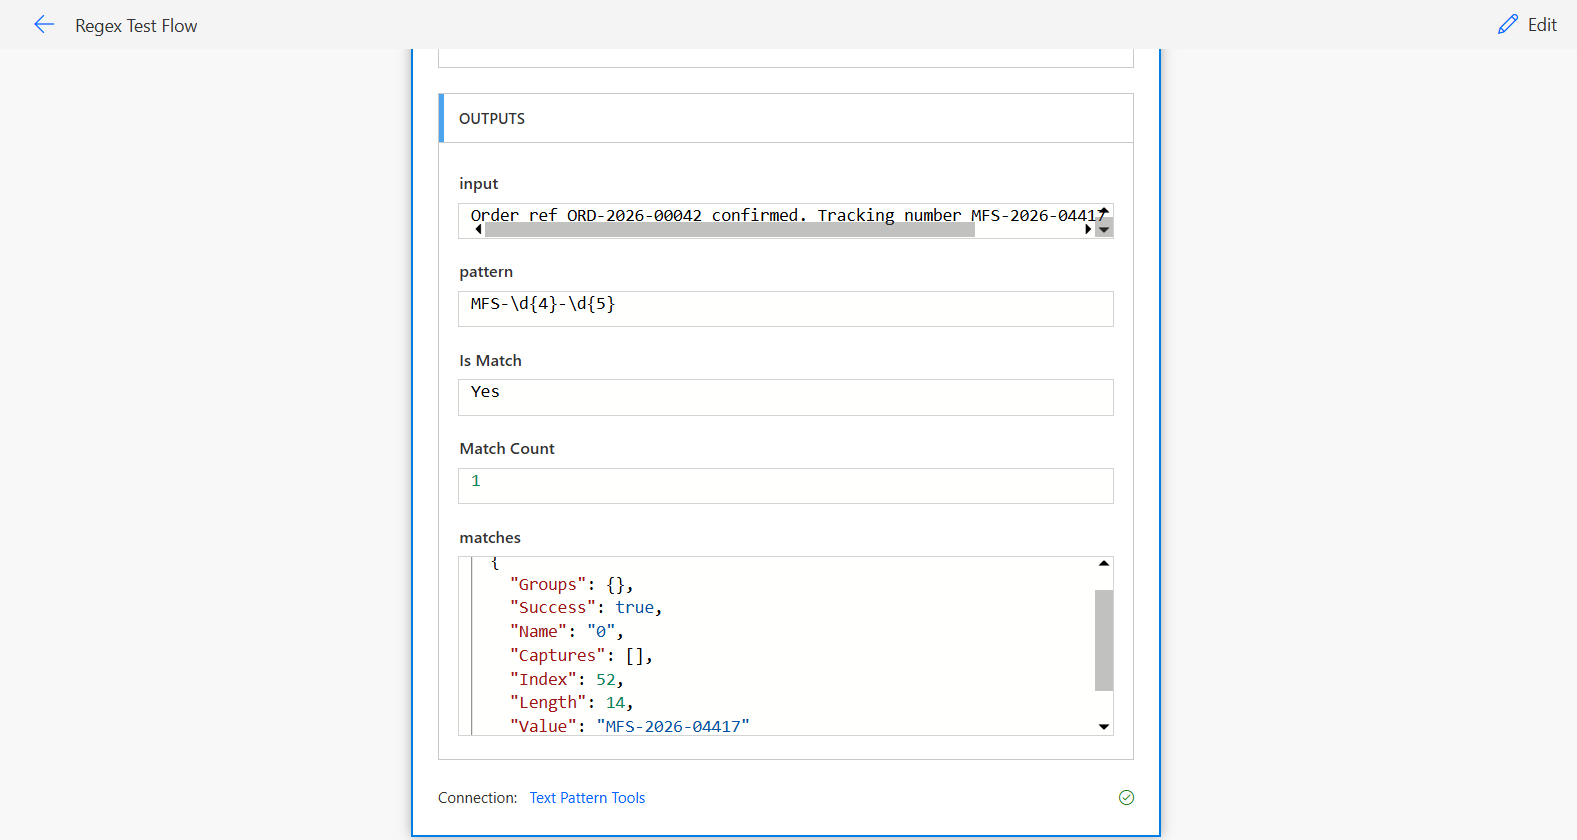
Click Response. Expected: Status 200, isMatch: true, matchCount: 1, Value: "MFS-2026-04417", and Validation succeeded at the bottom.
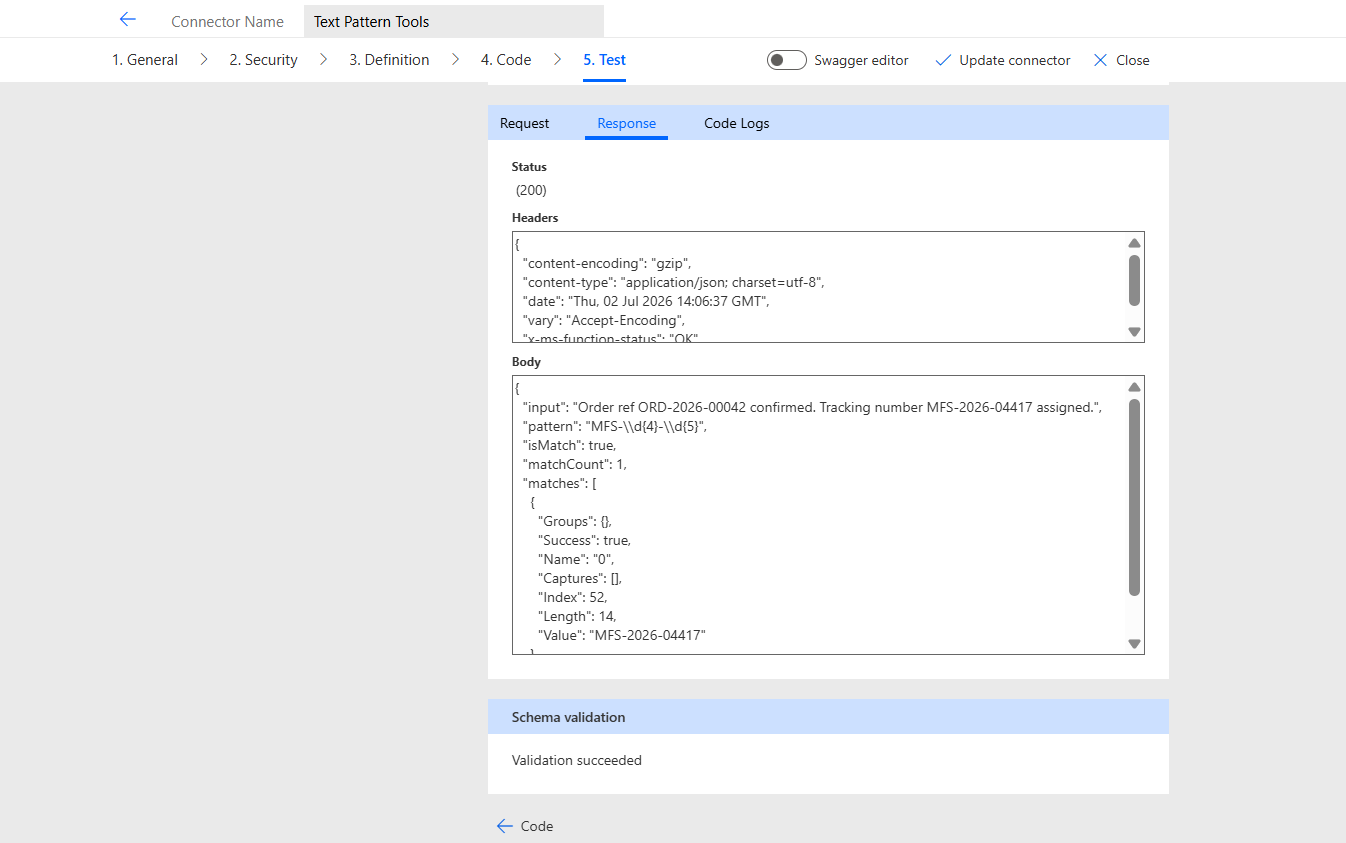
⚠️ Schema validation warning
If you see “Property ‘.matchCount’ type mismatch” — this happens only if you used Import from sample for the response instead of the full YAML from Step 3. The YAML already includes format: int32 on matchCount which prevents this. To fix it: go back to 3. Definition, toggle Swagger editor on, add format: int32 to matchCount, click Update connector, then re-run the test.
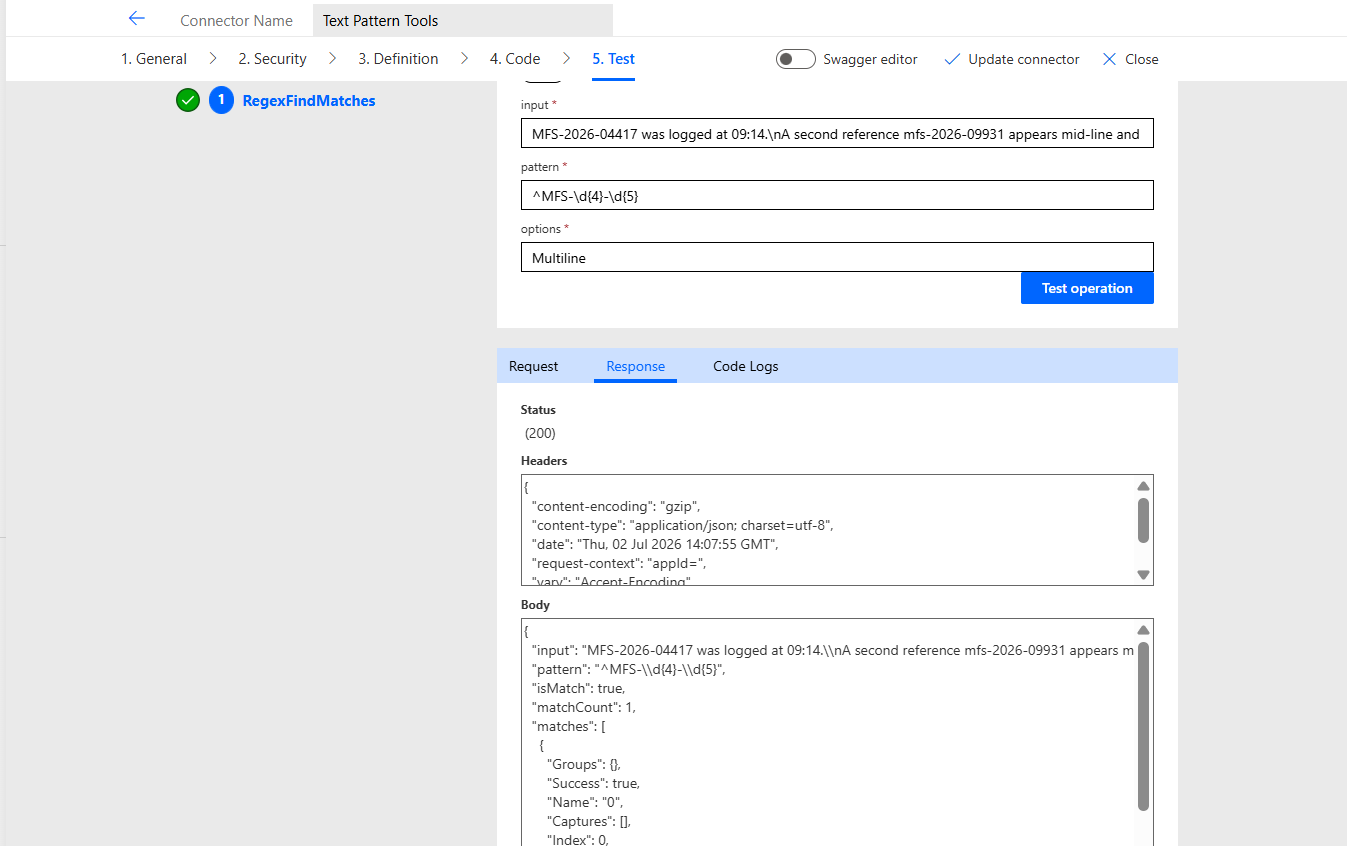
Run a second case to confirm the Multiline branch actually fires — not just the IgnoreCase path:
- input:
MFS-2026-04417 was logged at 09:14.\nA second reference mfs-2026-09931 appears mid-line and should not match. - pattern:
^MFS-\d{4}-\d{5} - options:
Multiline
Expected: isMatch: true, matchCount: 1, matching only MFS-2026-04417. The Multiline option makes ^ anchor to the start of each line rather than just the start of the whole string — but the pattern is case-sensitive here, and the second reference starts mid-line and is lowercase, so it doesn’t qualify.
⚠️ Troubleshooting
The two most common failures are a transient “failed to provision compute” error on save (try saving again) and an “Unknown operation ID” response (the operationId in the YAML and the string in the C# if check must match exactly).
Step 6 — Test End to End Inside a Real Flow
The Test tab proves the code-behind works in isolation. But it doesn’t prove the action behaves correctly once it’s wired into a real trigger with real dynamic content flowing into it instead of text you typed by hand. Before calling this done, build a minimal flow.
Go to Power Automate → Create → Instant cloud flow. Name it Regex Test Flow, select Manually trigger a flow as the trigger, and click Create.
In the flow designer, click + New step. The “Choose an operation” panel opens. Click the Custom tab — this filters the list to show only custom connectors in your environment. Select Text Pattern Tools, then select Regular Expression Match.
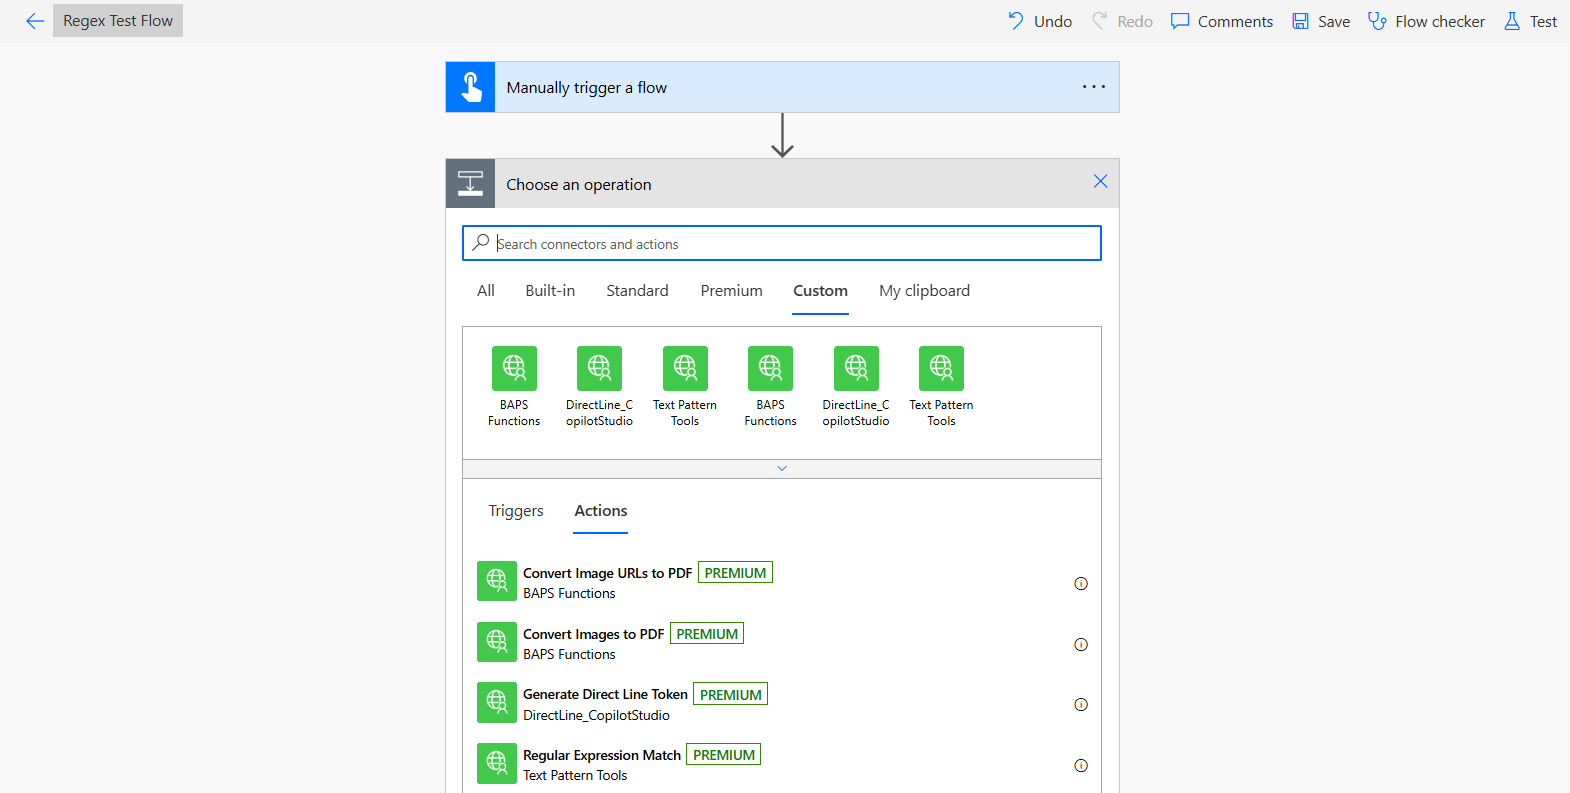
Fill in the action fields:
- Text to Search:
Order ref ORD-2026-00042 confirmed. Tracking number MFS-2026-04417 assigned. - Regex Pattern:
MFS-\d{4}-\d{5} - Regex Options:
IgnoreCase(already pre-filled from the dropdown)
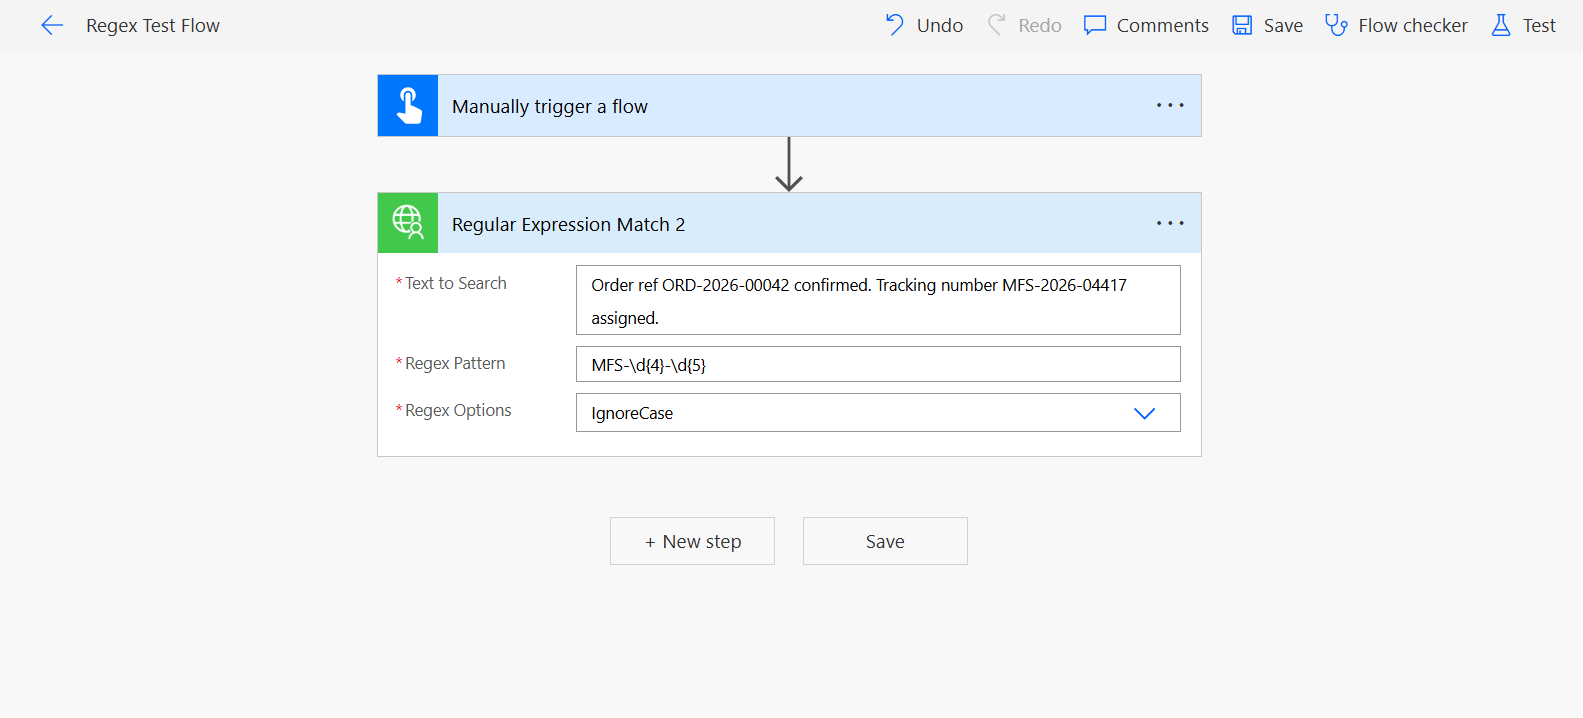
Click Save, then Test → Manually → Run flow. Open the run history to inspect the outputs. The OUTPUTS section shows each field as a named token — exactly what will be available as dynamic content in subsequent flow steps when this connector is used in a real production flow.
💡 Preview status
The code-behind feature carries a “Preview” label in the platform. Test thoroughly in a non-production environment before relying on it for anything business-critical.
4. ⚠️ One Thing to Know Before You Deploy This
Every Custom Connector — regardless of what it does internally — is classified as a Premium connector. This connector calls no external API, costs nothing to run, and uses No Authentication. None of that matters: the classification is based on connector type, not behavior.
The practical consequence: for an instant flow (one triggered by a person — a button, a Power Apps action), every user who runs it needs a Power Automate Premium license, not just the maker. For an automated or scheduled flow, only the flow owner needs the license, or the flow itself can carry a Process license (a license tied to the flow itself rather than a specific person, which removes the per-user requirement) instead.
There is no in-product warning at build time. It surfaces as a licensing compliance finding after rollout, or as a support ticket when a non-Premium user gets blocked.
If the pattern is fixed and you have Dataverse in the environment, the Dataverse low-code plugin route covered in Section 5 avoids this conversation entirely.
5. Alternatives Worth Knowing About
The Custom Connector is the most capable option on this list — and the one with the most fine print.
— vsgueradev.com
Here’s what each approach actually costs you, not just what it does.
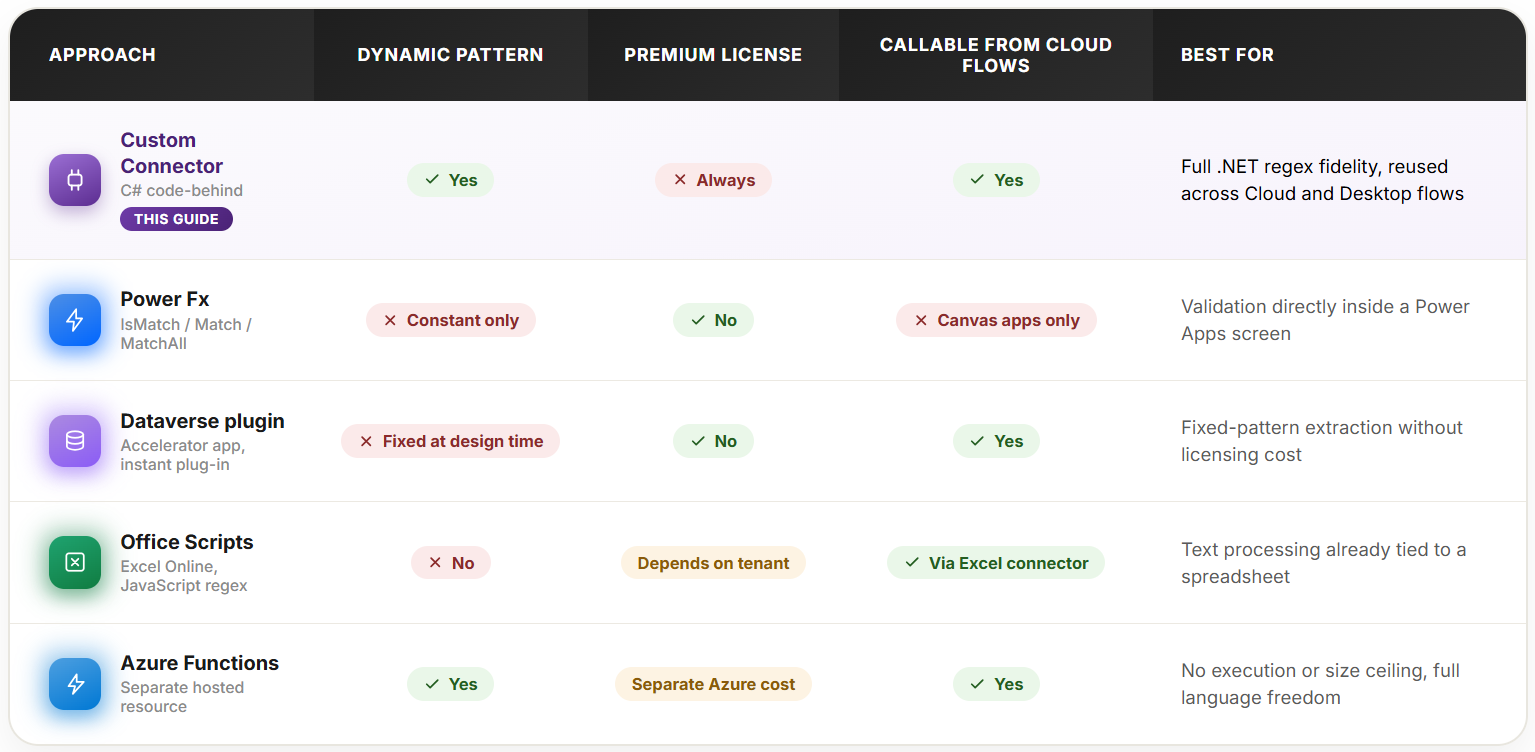
A Premium license isn’t a feature gap to work around — it’s the platform’s classification of the connector type, not its behavior. The honest question isn’t “which option is best,” it’s which trade-off your scenario actually needs.
Custom Connector with C# code-behind (this guide)
✅ Pros
- Full .NET regex fidelity — lookarounds, named groups, backreferences
- Pattern fully dynamic — passed at runtime from any dynamic content
- Reusable across Cloud flows and Desktop flows from one connector
- One connector, multiple operations possible if you extend it
❌ Cons
- Always Premium — every instant-flow user needs a license or the flow needs a Process license
- 5-second execution ceiling (possibly 2 minutes for newer connectors — contradicted in docs) and 1 MB code size
- Requires someone with enough C# to write and maintain the code-behind
- Single script file, no built-in logging, no on-premises gateway, no private VNet endpoints
- Preview status — no GA timeline published by Microsoft
Power Fx IsMatch / Match / MatchAll (in Power Apps directly)
✅ Pros
- Completely native — no connector, no Premium classification, no code to maintain
- Same general regex syntax for common cases
- Immediate — works the moment you type the formula
❌ Cons
- Only inside Power Apps canvas apps — not in Cloud flow expressions
- Pattern must be a constant — cannot come from a variable or data source
- IsMatch is not delegable (not executable on the server — Power Apps must pull all records locally first before filtering)
- Smaller feature subset than full .NET regex — some advanced constructs unavailable
Dataverse low-code plugin via the Dataverse Accelerator app
This is the realistic “skip the custom connector” path for fixed-pattern scenarios. Configured through a GUI — the Dataverse Accelerator app → “Create instant plug-in” card — with Input/Output parameters and a Power Fx expression, for example: {Result: Match(Input, "MFS-\d{4}-\d{5}").FullMatch}.
✅ Pros
- No Premium connector classification triggered by this step itself
- No C# required — configured through a GUI
- Genuinely callable from Cloud flows via the standard Dataverse connector’s “Perform an unbound action”
❌ Cons
- Requires System Administrator or System Customizer role to set up
- Requires the Dataverse Accelerator app installed in the environment (from AppSource, under Dynamics 365 apps)
- Pattern still fixed at plugin-design time — same constant-only limitation as Power Fx
Office Scripts + Excel Online
JavaScript regex is a well-known, fully-featured dialect for anyone with a web development background. Natural fit when the data already lives in a spreadsheet. But forcing data into Excel just to get regex support is the wrong direction for most scenarios.
Azure Functions
No execution time ceiling, no 1 MB limit, full .NET regex capability, plus anything else the function needs to do. The trade-off: it requires provisioning and maintaining a separate Azure resource. Disproportionate overhead for a single helper function like a regex match — this is the heaviest option on the list for what is ultimately a lightweight job.
🎯 The Honest Summary
If your pattern is fixed and you have Dataverse already in play, the Dataverse low-code plugin route avoids the licensing conversation entirely — and is arguably the better starting point. The Custom Connector approach in this guide earns its place specifically when the pattern needs to be dynamic, when full .NET regex features are required, or when the same logic needs to be reused across both Cloud and Desktop flows. It’s not the default first reach for every text-matching need, and the Preview status of the code-behind feature is worth factoring into your production readiness assessment.
The best solution isn’t the most powerful one. It’s the one you can ship, maintain, and explain to the next person who inherits the flow.